Set up single sign on using Okta
This guide shows you how to set up Okta and Airbyte so your users can log into Airbyte using your organization's identity provider (IdP).
Overview
This guide is for administrators. It assumes you have:
- Basic knowledge of Okta, OpenID Connect (OIDC), and Airbyte
- The permissions to manage Okta in your organization
- Organization admin permissions for Airbyte
The exact process differs between the Cloud or Self-Managed versions of Airbyte. Steps for both are below.
Cloud with Okta OIDC
For security purposes, when a user who owns applications logs in with SSO for the first time, Airbyte disables their existing applications. Those users must replace any application secrets that were previously in use to ensure API and Terraform integrations don't break.
Part 1: Create a new Okta application
-
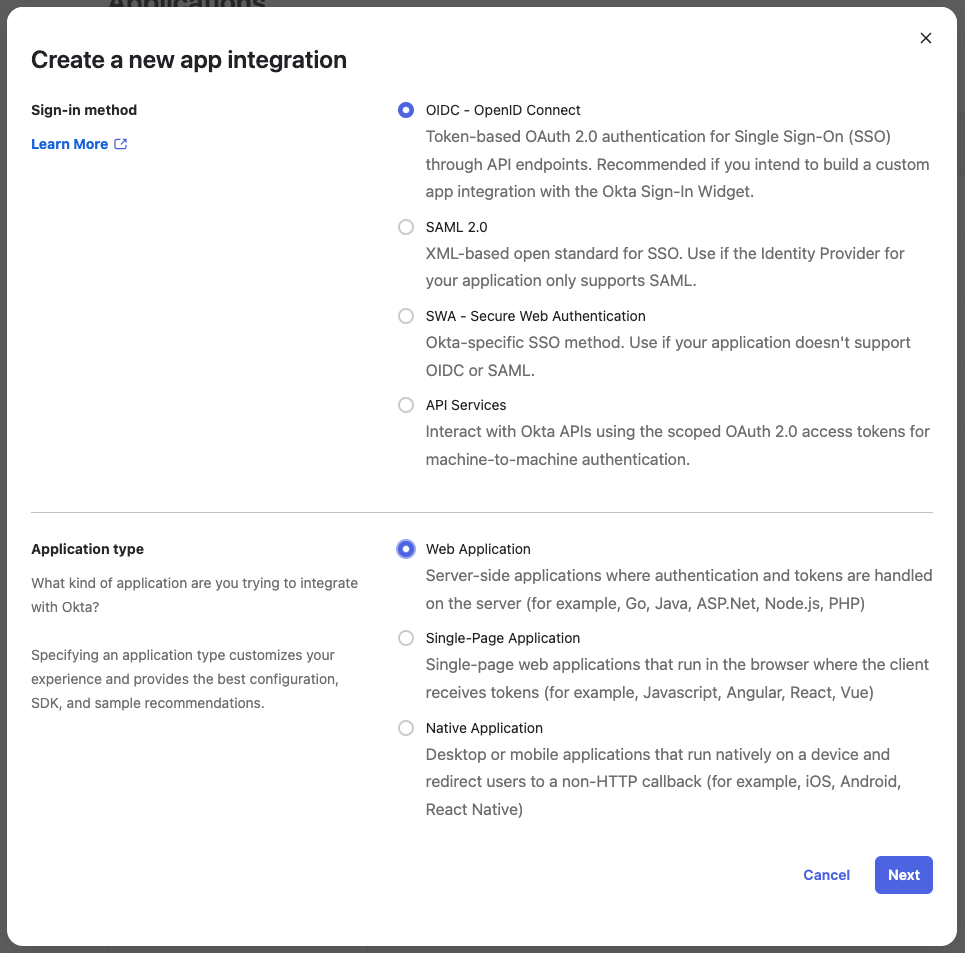
In Okta, create a new Okta OIDC App Integration for Airbyte. For help, see Okta's documentation. Create an app integration with the following options.
-
Sign-in method: OIDC - OpenID Connect
-
Application type: Web application
-
-
Click Next.
-
Set the following parameters for your app integration.
-
App integration name:
Airbyte(or something similar) -
Grant type:
Authorization code -
Sign-in redirect URIs:
https://cloud.airbyte.com/auth/realms/<your-company-identifier>/broker/default/endpointReplace
<your-company-identifier>with a unique identifier for your organization. This is often your organization name or domain (for example,airbyte). You'll use this same identifier when configuring SSO in Airbyte.tipTo avoid coming back later to change this, check if this company identifier is available now by trying to log into Airbyte with it. If the company identifier is already claimed, Airbyte tries and fails to log you into another organization's IdP.
-
Sign-out redirect URIs:
https://cloud.airbyte.com/auth/realms/<your-company-identifier>/broker/default/endpoint/logout_response -
Trusted origins: Leave empty.
-
Assignments > Controlled access: Depending on your needs, choose either
Limit access to selected groupsorAllow everyone in your organization to access. -
Leave other values as defaults unless you have a reason to change them.
-
-
Click Save.
Part 2: Domain verification
Before you can enable SSO, you must prove to Airbyte that you or your organization own the domain on which you want to enable SSO. You can enable as many domains as you need.
-
In Airbyte, click Organization settings > SSO.
-
Click Add Domain.
-
Enter your domain name (
example.com,airbyte.com, etc.) and click Add Domain. The domain is added to the Domain Verification list with a "Pending" status and Airbyte shows you the necessary DNS record. -
Add the DNS record to your domain. You might need help from your IT team to do this. Generally, you follow a process like this:
-
Sign into the website where you manage your domain.
-
Look for something like DNS Records, Domain Management, or Name Server Management. Click it to go to your domain's DNS settings.
-
Find TXT records.
-
Add a new TXT record using the record type, record name, and record value that Airbyte gave you.
-
Save the new TXT record.
-
-
Wait for Airbyte to verify the domain. This process can take up to 24 hours, but typically it happens faster. If nothing has happened after 24 hours, verify that you entered the TXT record correctly.
Part 3: Configure and test SSO in Airbyte
-
In Airbyte, click Organization settings > SSO.
-
Click Set up SSO, then input the following information.
-
Company identifier: The unique identifier you used in the redirect URI in Okta. For example,
airbyte. -
Client ID: In Okta's administrator panel, Applications > Applications > Airbyte > General tab > Client ID.
-
Client secret: Your client secret from your Okta application.
-
Discovery URL: Your OpenID Connect (OIDC) metadata endpoint. It's similar to
https://<yourOktaDomain>/.well-known/openid-configuration.
-
-
Click Test your connection to verify your settings. Airbyte forwards you to your identity provider. Log in to test that your credentials work.
-
If the test is successful, you return to Airbyte and see a "Test Successful" message.
-
If the test wasn't successful, either Airbyte or Okta show you an error message, depending on what the problem is. Verify the values you entered and try again.
-
-
Click Activate.
Once you activate SSO, users with your email domain must sign in using SSO.
If users can't log in
If you successfully set up SSO but your users can't log into Airbyte, verify that they have access to the Airbyte application you created in Okta.
Update SSO credentials
To update SSO for your organization, contact support.
Domain verification statuses
Airbyte shows one of the following statuses for each domain you add:
Pending: Airbyte created the DNS record details and is waiting to find the record in DNS. You see this status after you add a domain. DNS propagation can take time. If the status is still Pending after 24 hours, verify that the record name and value exactly match what Airbyte shows.
Verified: Airbyte found a TXT record with the expected value. The domain is verified and can be used with SSO. Users with email addresses on this domain must sign in with SSO.
Failed: Airbyte found a TXT record at the expected name, but the value doesn't match. This usually means the TXT record was created with a typo or wrong value. Update the TXT record to match the value shown in Airbyte, then click Reset to retry verification.
Expired: Airbyte couldn't verify the domain within 14 days, so it marked the verification as expired. After you've fixed your DNS configuration, click Reset to move it back to Pending, or delete it and start over.
Remove a domain from SSO
If you no longer need a domain for SSO purposes, delete its verification.
-
In Airbyte, click Organization settings > SSO.
-
Next to the domain you want to stop using, click Delete.
Self-Managed Enterprise with Okta OIDC
You need to create a new Okta OIDC App Integration for Airbyte. Documentation on how to do this in Okta can be found here. You should create an app integration with OIDC - OpenID Connect as the sign-in method and Web Application as the application type:
Before you can proceed, you require your Company Identifier so you can properly fill in these values. Your contact at Airbyte gives this to you.
Create the application with the following parameters:
- App integration name
- Please choose a URL-friendly app integration name without spaces or special characters, such as
my-airbyte-app. Screenshot of Okta app integration name Spaces or special characters in this field could result in invalid redirect URIs. - Logo (optional)
- You can upload an Airbyte logo, which you can find at https://airbyte.com/company/press
- Grant type
- Only Authorization Code should be selected
- Sign-in redirect URIs
<your-airbyte-domain>/auth/realms/airbyte/broker/<app-integration-name>/endpoint<your-airbyte-domain>refers to the domain you access your Airbyte instance at, e.g.https://airbyte.internal.mycompany.com<app-integration-name>refers to the value you entered in the App integration name field- Sign-out redirect URIs
<your-airbyte-domain>/auth/realms/airbyte/broker/<app-integration-name>/endpoint/logout_response- Trusted Origins
- Leave empty
- Assignments > Controlled Access
- You can control whether everyone in your Okta organization should be able to access Airbyte using their Okta account or limit it only to a subset of your users by selecting specific groups who should get access.
Once your Okta app is set up, you're ready to deploy Airbyte with SSO. Take note of the following configuration values, as you will need them to configure Airbyte to use your new Okta SSO app integration:
- Okta domain (How to find your Okta domain)
- App Integration Name
- Client ID
- Client Secret
Visit the implementation guide for instructions on how to deploy Airbyte Enterprise using kubernetes, kubectl and helm.
Self-Managed Enterprise with Okta Generic OIDC
To set up single sign using generic OIDC for Airbyte Self-Managed Enterprise, complete the following steps.
- Create an Okta application for Airbyte
- Add an authorization server (optional)
- Add a policy for Airbyte
- Update Airbyte's values.yaml file
- Redeploy Airbyte
You can only use generic OIDC after you migrate to Helm chart V2.
Create an Okta app for Airbyte
Follow these steps to set up an Okta app integration for Airbyte. If you need more help setting up an app integration, see Okta's documentation.
-
Log into your Okta administrator dashboard. For example:
example.okta.com/admin/dashboard. -
Click Applications > Applications.
-
Click Create App Integration, then choose the following values.
-
Sign-in method: OIDC - OpenID Connect
-
Application type: Single-Page Application
-
-
Click Next.
-
Choose the following options:
-
App integration name: Airbyte
-
Grant type: Authorization Code, Refresh Token
-
Sign-in redirect URIs: The domain depends of your Airbyte installation location, but the URI should look similar to
https://airbyte.example.com. -
Sign-out redirect URIs: Set it to your base Airbyte site. For example:
https://airbyte.example.com. -
Controlled access: Depending on your needs, choose either
Limit access to selected groupsorAllow everyone in your organization to access. -
Leave other values as defaults unless you have a reason to change them.
-
-
Click Save. Okta takes you to your app page.
-
On the app page, make sure you have Require PKCE as additional verification enabled. Leave other values as defaults.
Add an authorization server
You need an authorization server, but you probably already have one. If you do, you can use it for Airbyte too. If you need to create a new one, follow these steps.
-
Click Security > API.
-
Click Add Authorization Server.
-
Give your authorization server a name, audience, and description. Then, click Save. For demonstration purposes, this guide assumes you name your authorization server
webapps.
Before continuing, go to your authorization server's page in Okta and open the Issuer Metadata URL link in a new tab. This is your well-known endpoint. You need some of these values later, so set it aside for a moment.
Add an access policy
Add an access policy to your authorization server.
-
Click Security > API > choose your authorization server > Access Policies > Add Policy.
-
Give your policy a name and description. Under Assign to, choose The following clients, then search for your Airbyte application (you probably called it Airbyte). Okta shows you your new policy.
-
Click Create Policy.
-
Click Add rule.
-
Fill out the form.
-
Give your rule a descriptive name, like "Log into Airbyte".
-
Grant Authorization Code and Token exchange. Don't grant anything else unless you have a reason to.
-
Choose Any user assigned the app.
-
Choose Any scopes.
-
Click Create rule.
-
Leave other values as defaults unless you have a reason to change them.
-
Update your values.yaml file
Once you have an app integration for Airbyte, update the values.yaml file you use when you deploy Airbyte. This section is where you need information from the well-known endpoint you opened earlier.
Under global, add a new auth section and fill in the following data.
global:
  edition: "enterprise"
  airbyteUrl: "airbyte.example.com"
  enterprise:
    secretName: "airbyte-license"
    licenseKeySecretKey: "LICENSE_KEY"
  # Add this new auth section. See below for help populating these values.
  auth:
    identityProvider:
      type: generic-oidc
      genericOidc:
        clientId: YOUR_CLIENT_ID
        audience: YOUR_AUDIENCE
        extraScopes: YOUR_EXTRA_SCOPES
        issuer: YOUR_ISSUER
        endpoints:
          authorizationServerEndpoint: YOUR_AUTH_ENDPOINT
          jwksEndpoint: YOUR_JWKS_ENDPOINT
You collect these values from Okta in the locations shown below.
-
clientId: In Okta's administrator panel, Applications > Applications > Airbyte > General tab > Client ID. -
audience: In Okta's administrator panel, Security > API > Authorization Servers tab > Audience. Choose the audience for the authorization server you're using with Airbyte. -
extraScopes: If you've defined extra scopes in your authorization server, you can reference them here. Extra scopes are included in the authorization code flow and are sometimes required to provide web apps like Airbyte with valid JSON web tokens. In Okta's administrator panel, Security > API > Authorization Servers tab > your authorization server > Scopes. -
issuer: In your well-known endpoint, use theissuer. -
authorizationServerEndpoint: In your well-known endpoint, use theauthorization_endpoint, but omit the/v1/authorizeportion. For example,https://example.okta.com/oauth2/default/. -
jwksEndpoint: In your well-known endpoint, use thejwks_uri.
Deploy Airbyte
In your command-line tool, deploy Airbyte using your updated values file. The examples here may not reflect your actual Airbyte version and namespace conventions, so make sure you use the settings that are appropriate for your environment.
helm upgrade -i \
--namespace airbyte \
--values ./values.yaml \
airbyte \
airbyte-v2/airbyte \
--version 2.x.x