Connector Builder tutorial
In this tutorial, you'll create an Airbyte connector using the Connector Builder UI to read and extract data from an API called the Exchange Rates API. The steps here are a foundation you can use to build connectors for any API you might be interested in. You can complete this tutorial in 30-45 minutes.
Here's the API documentation for the Exchange Rates API. Feel free to review it, but you don't need to know it well. In this tutorial, you'll read data from the following endpoints:
- Latest Rates
- Historical Rates
Your goal is to build and publish a source connector with two streams containing exchange rates from a base currency to many other currencies. The output schema of our streams will look like this:
{
  "base": "USD",
  "date": "2022-07-15",
  "rates": {
    "CAD": 1.28,
    "EUR": 0.98
    // ...
  }
}
Step 1: Setup
Set up an Exchange Rates API key
Generate a free API access key for the Exchange Rates API.
-
Visit https://apilayer.com
-
Sign into an existing account or sign up for a new account.
-
Once you're signed in, visit the Exchange Rates API and sign up for the Free tier. After signing up, an API key appears on the page.
-
Copy or save that API key.
Set up Airbyte
You need access to Airbyte, if you don't already have it. Do one of the following:
-
Sign up for Airbyte Cloud
-
Run Airbyte on your own infrastructure
Step 2: Initial configuration
Create a Connector Builder project
When developing a connector using the Connector Builder UI, Airbyte saves the current state of your work as a connector builder project. These projects are saved as part of your Airbyte workspace and are separate from your sources, destinations, and connections.
-
Visit the Airbyte UI in your browser.
-
Click Builder in the navigation.
-
Select Start from scratch to start a new connector builder project. If your workspace already has custom connectors, click New custom connector, then click Start from scratch.
-
Click Skip and start manually to skip using the AI Assistant.
-
Set the connector name to
Exchange Rates (Tutorial).
Your connector builder project is now set up.
Set up global configuration and inputs
On the Global Configuration page, you set up general settings applying to all streams: which streams to test when running a check operation, concurrency levels, and API budgets for manage rate limiting. For now, you don't have any global configurations to make.
On the Inputs page, you manage inputs that users of your connector have to fill in themselves. This is a great use case for an API key: you always need an API key, but everyone using the connector needs their own.
-
Click Inputs.
-
Click Add new user input.
-
Add the following values.
-
Set Input name to "API key".
-
Set Field ID to "api_key".
-
Set Type to "String".
-
Turn on Secret field and Required field, but leave Hidden field and Enable default value off.
-
-
Click Create.
-
Enter your API key for testing purposes. This API Key is not part of the connector itself. Instead, users of your connector will enter their own API key as part of the source configuration.
Set up and test a stream
Set up a new stream and tell your connector how to retrieve records from this source.
-
Next to Streams, click the Plus icon.
-
Set the name to Rates.
-
Set the API Endpoint URL to
https://api.apilayer.com/exchangerates_data/latest?base=USD. -
Set HTTP Method to
GET. -
Turn on Authenticator, then turn on the Shared Authenticator toggle so other streams in this authentication can use this.
-
Set API Key to
{{ config['api_key'] }}. This allows the stream to use the API key input you created earlier when you test it. If someone else uses your connector later, the connector uses the API key they input, not yours. -
Turn on Inject API Key Into Outgoing HTTP Request.
-
Set Inject Into to
Headerand set Header Name toapikey.
-
-
Click Test to test the stream.
The API returns a response that looks like this.
{
  "status": 200,
  "body": {
    "success": true,
    "timestamp": 1752629824,
    "base": "USD",
    "date": "2025-07-16",
    "rates": {
      "AED": 3.6725,
      "AFN": 69.470828,
      "ALL": 84.383278,
      "AMD": 386.552088,
      "ANG": 1.789699,
      "AOA": 917.000213,
      // ...
    }
  }
}
If this were a real sync, Airbyte would pass this record to your destination.
-
The Request and Response tabs are helpful during development to see which requests and responses your connector will send and receive from the API.
-
The Schema tab indicates the schema that was detected by analyzing the returned records. This detected schema is automatically set as the declared schema for this stream.
Step 3: Stream configuration
In this step, you'll enhance your connector to accept more user inputs and return incremental data over time.
Make the base currency configurable
The Exchange Rates API allows you to configure a different base currency using a query parameter. Make that a user input so anyone using this connector can input their preferred currency, the same as their API key.
-
In the navigation, click Inputs to go back to the user inputs screen.
-
Click Add new user input. Add a new input called
base. Set Type to String again and turn off Required field. -
Click Create. For testing purposes, set the base to
USD,CAD,GBP, or any other currency code you prefer. -
Return to your Rates stream.
-
Check Query Parameters.
-
Click Add Key/Value Pair.
-
Set Key to
baseand Value to{{ config['base'] }}. -
Update API Endpoint URL to
https://api.apilayer.com/exchangerates_data/latestso the base currency is no longer set explicitly with the URL. -
Click Test. This time, the stream returns exchange rates in the currency you set in your
baseinput.
Now, when making requests, your connector uses the currency the connector user specifies. You can repeat this pattern in many contexts, making your connectors more robust for different people in different contexts.
Add incremental reads
Currently, your connector only reads the latest data, but it doesn't collect historical data. You can read the exchange rates for a specific date by querying the "/exchangerates_data/{date}" endpoint instead of "/exchangerates_data/latest".
-
Go back to the Inputs page and create a new input.
-
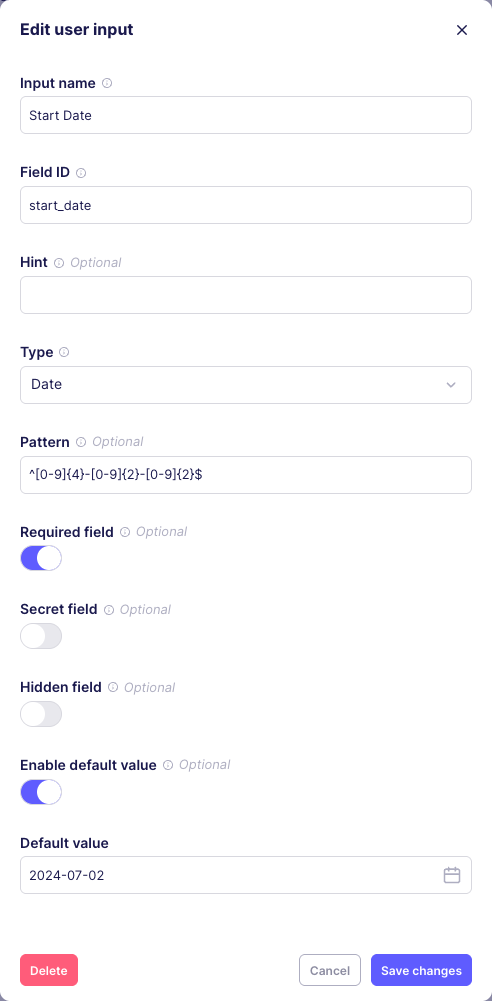
Set Input name to
Start Date. -
Set Type to
Date. -
Set Pattern to
^[0-9]{4}-[0-9]{2}-[0-9]{2}$. -
Turn on Required field and Enable default value. Set the default value to any recent or meaningful date. Turn off the other toggles.
-
Click Save changes.
-
-
Create a new stream and call it Historical Rates.
-
Set the API Endpoint URL to
https://api.apilayer.com/exchangerates_data/{{ config['start_date'] }}?base={{ config['base'] }}.tipNotice how, unlike step 2, you're setting the
basequery parameter on the URL itself rather than creating a query parameter in the form below. Both options are fine, but the query parameter form feature is more powerful at scale. -
Set up your Authenticator so it's identical to the
Ratesstream.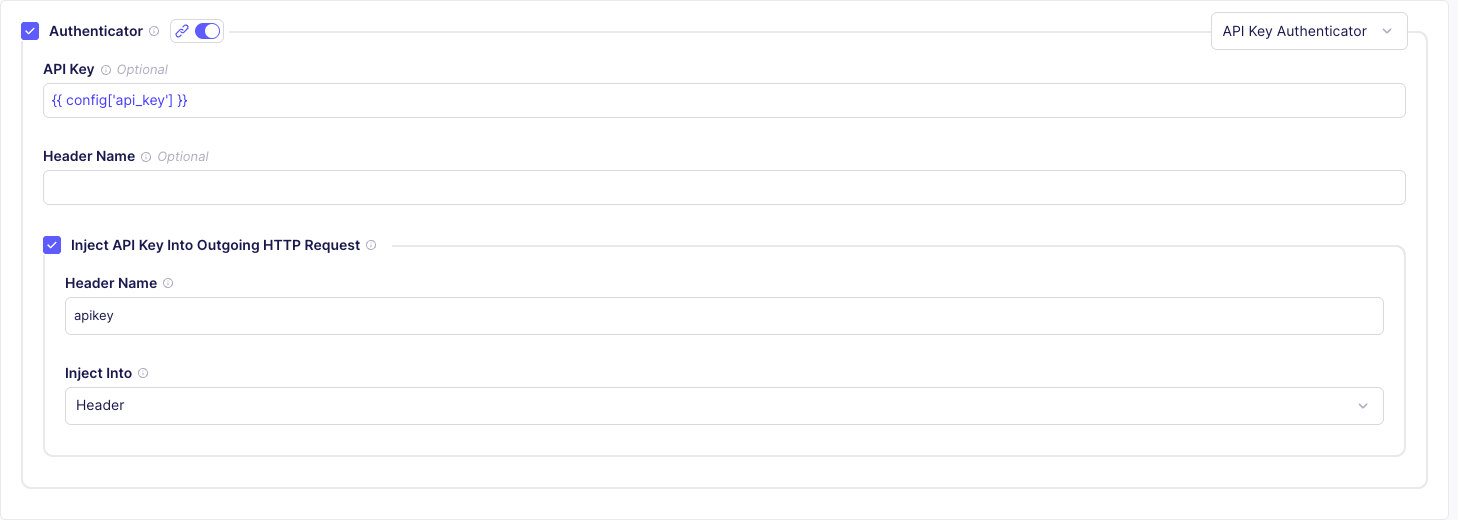
-
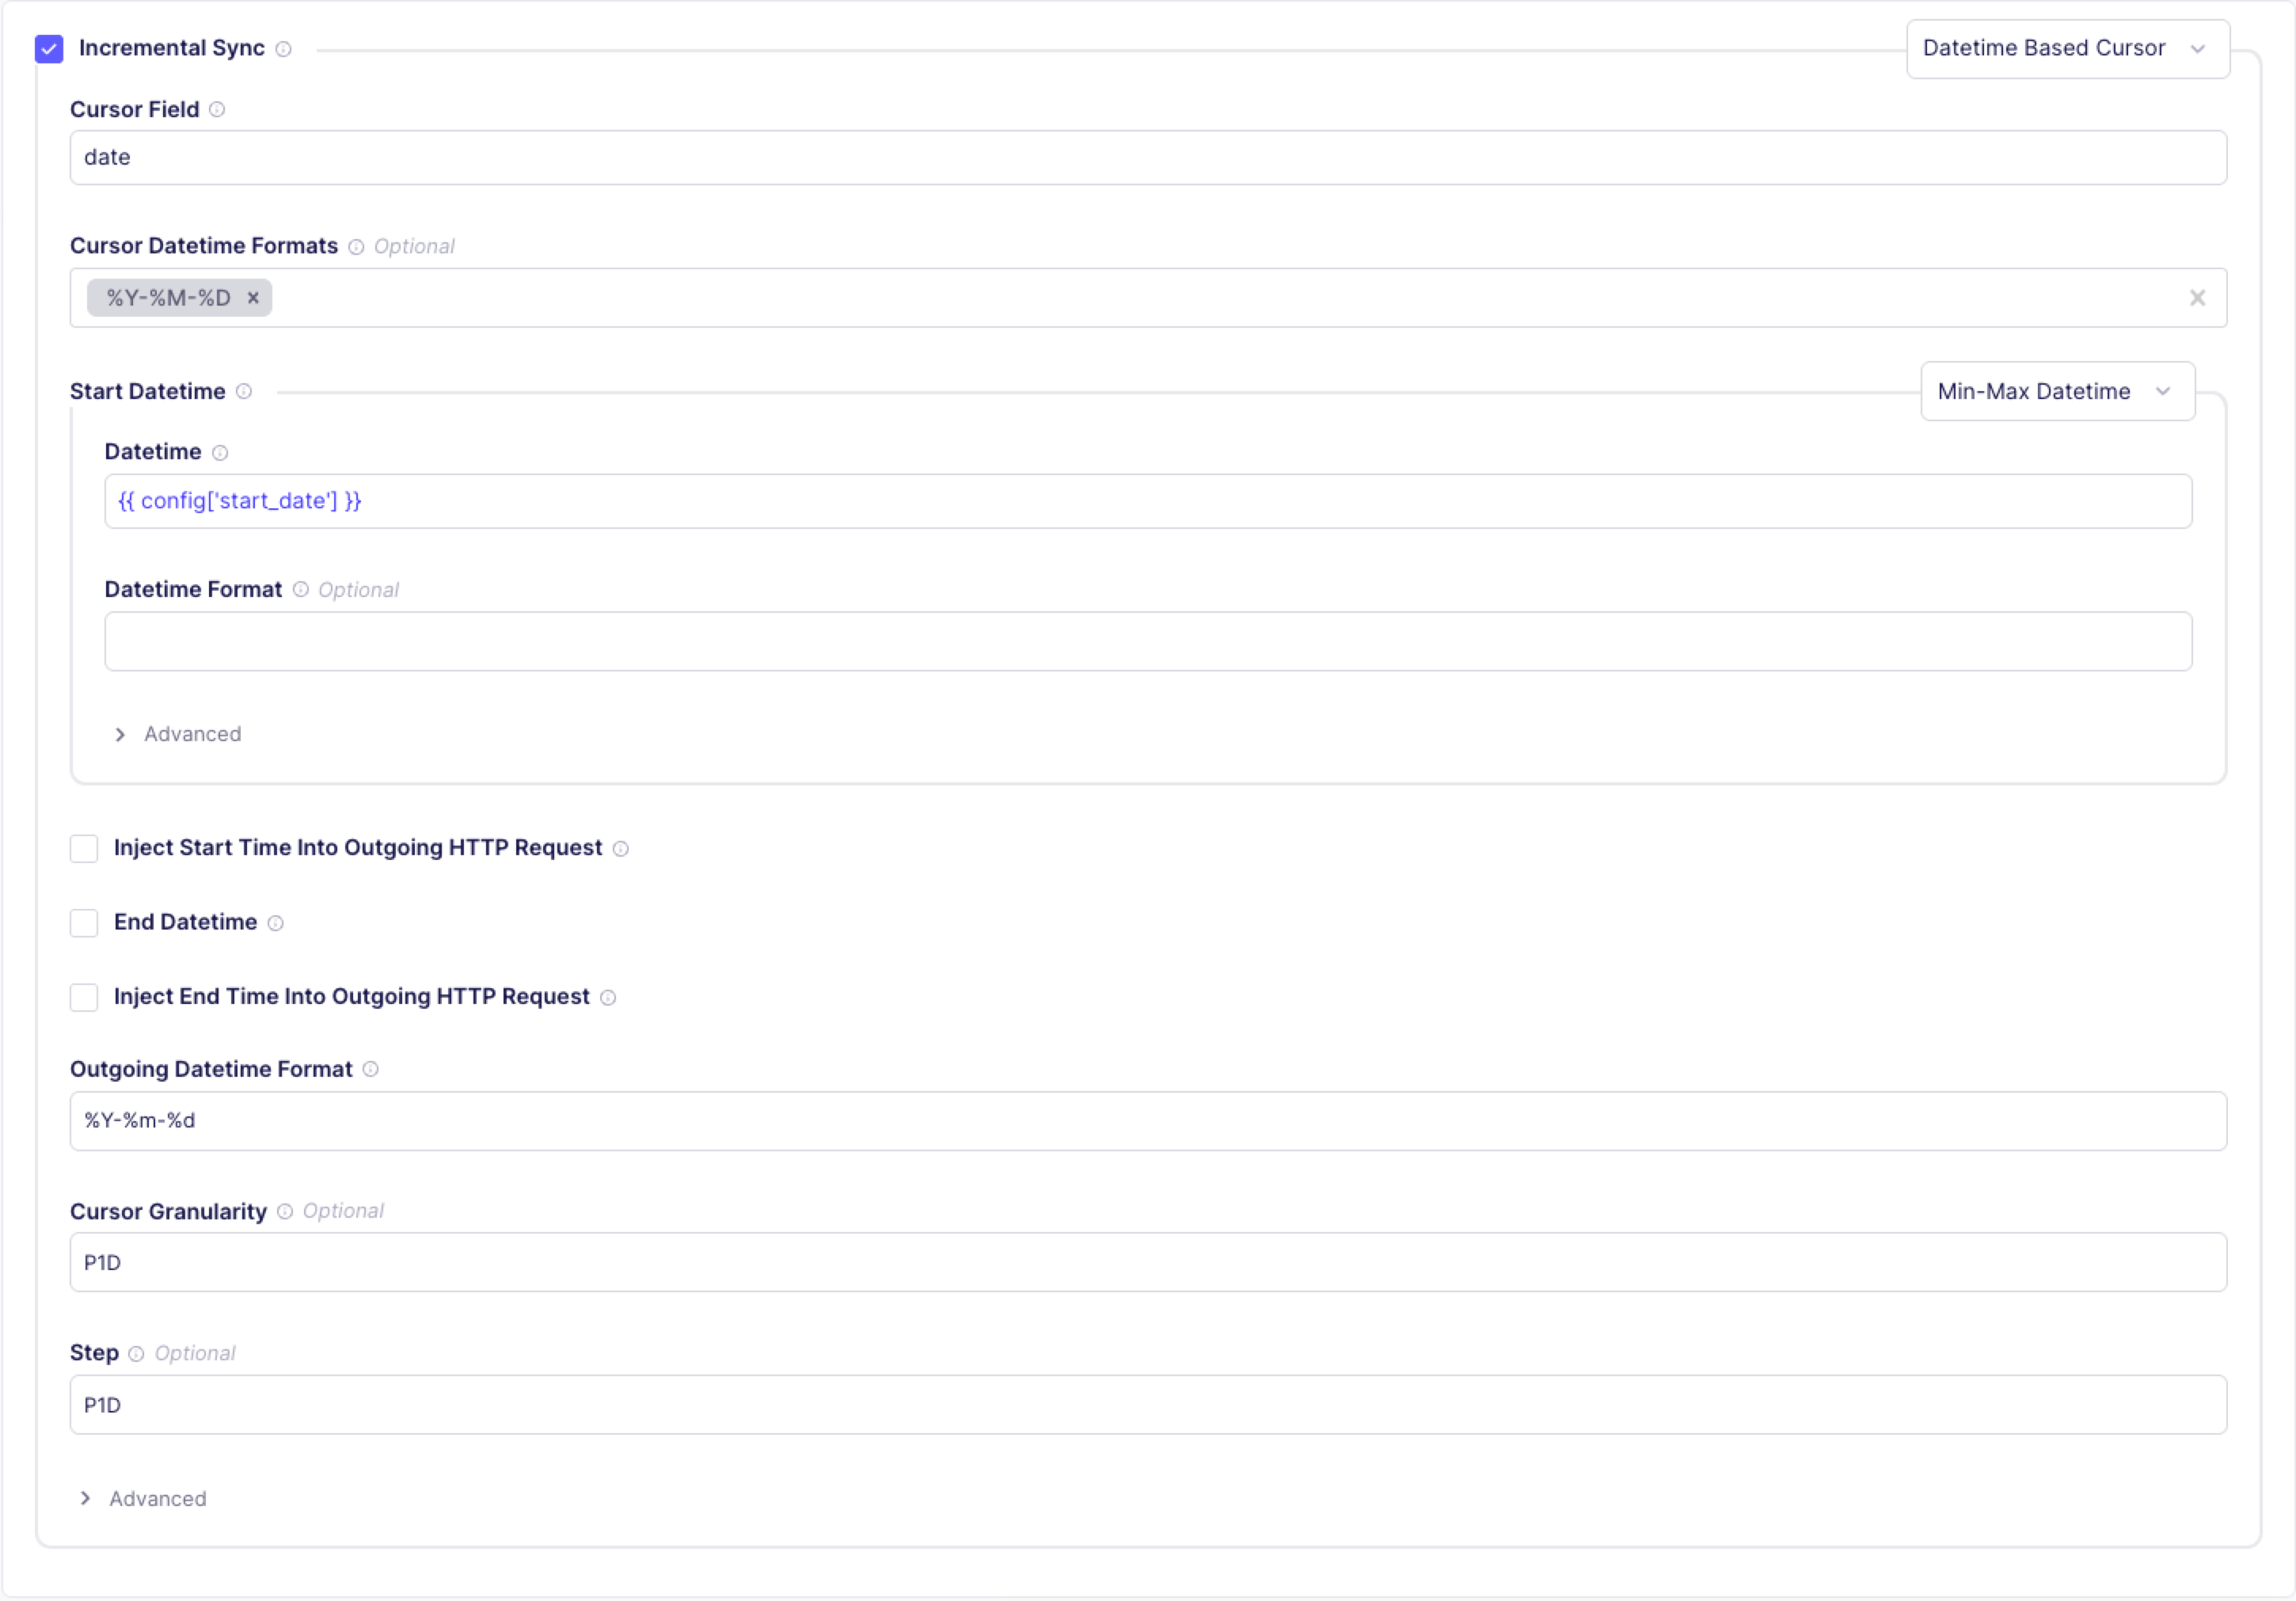
Turn on Incremental Sync.
-
Set Cursor Field to
date. -
Set Cursor Datetime Formats to
%Y-%M-%D. -
Under Start Datetime, set Datetime to
{{ config['start_date'] }}. -
Set Outgoing Datetime Format to
%Y-%m-%d. -
Set Cursor Granularity to
P1D. -
Set Step to
P1D.
-
-
Click Test. Once you receive a response, you see a dropdown above the records view that lets you step through the daily exchange rates along with the requests performed to fetch this data. To speed up testing, the Connector Builder only shows you the first 5 partitions. During a real sync, Airbyte pulls data for the full range of time.

When used in a real connection, the connector will not request exchange rates for the same day multiple times. The date of the last fetched record will be stored and the next scheduled sync will pick up from where the previous one stopped.
Step 4: Publish and sync
So far, you've configured this connector as part of a Connector Builder project. To use this connector in actual connections, you need to publish it. This captures the current state of the configuration and makes the connector available as a Custom Connector within the current Airbyte workspace.
-
Click Publish.
-
Choose Publish to organizaton
-
Give your connector a name and description.
-
Click Publish.
Congratulations! You now have a production-ready Exchange Rates connector.
What's next?
You, or someone in your organizaton, can set up your connector as a source and start syncing data with it at any time.
This tutorial only covers some basic concepts, but there are many more features in the Connector Builder. Learn more on the following pages:
- AI Assistant
- Authentication
- Record processing
- Pagination
- Incremental sync
- Partitioning
- Error handling
- Stream templates
- Asynchronous job streams
The Connector Builder supports a broad range of APIs, but not every API can be consumed by the Connector Builder. If you need more flexibility, consider using the Python CDK to build a connector with additional features.