Manage notifications
This page provides guidance on how to manage notifications for Airbyte, allowing you to stay up-to-date on the activities in your workspace.
Notification Event Types
| Type of Notification | Description |
|---|---|
| Failed Syncs | A sync from any of your connections fails. Note that if sync runs frequently or if there are many syncs in the workspace these types of events can be noisy |
| Successful Syncs | A sync from any of your connections succeeds. Note that if sync runs frequently or if there are many syncs in the workspace these types of events can be noisy |
| Automated Connection Updates | A connection is updated automatically (ex. a source schema is automatically updated) |
| Connection Updates Requiring Action | A connection update requires you to take action (ex. a breaking schema change is detected) |
| Warning - Repeated Failures | A connection will be disabled soon due to repeated failures. It has failed 20 times consecutively and there were only failed jobs in the past 4 days |
| Sync Disabled - Repeated Failures | A connection was automatically disabled due to repeated failures. It will be disabled when it has failed 30 times consecutively and has been failing for 7 days in a row |
| Warning - Upgrade Required (Cloud only) | A new connector version is available and requires manual upgrade |
| Sync Disabled - Upgrade Required (Cloud only) | One or more connections were automatically disabled due to a connector upgrade deadline passing |
Enabling schema update notifications
To be notified of any source schema changes, make sure you have enabled Automatic Connection Updates and Connection Updates Requiring Action notifications. If these are off, even if you turned on schema update notifications in a connection's settings, Airbyte will NOT send out any notifications related to these types of events.
To edit this setting, click Connections and select the connection you want to receive notifications for. Click the Settings tab on the Connection page. In the Advanced Settings, toggle Schema update notifications.
Configure Email Notification Settings
To set up email notifications, click Settings and navigate to Workspace > Notifications.
Toggle which messages you'd like to receive from Airbyte. All email notifications will be sent by default to the creator of the workspace.
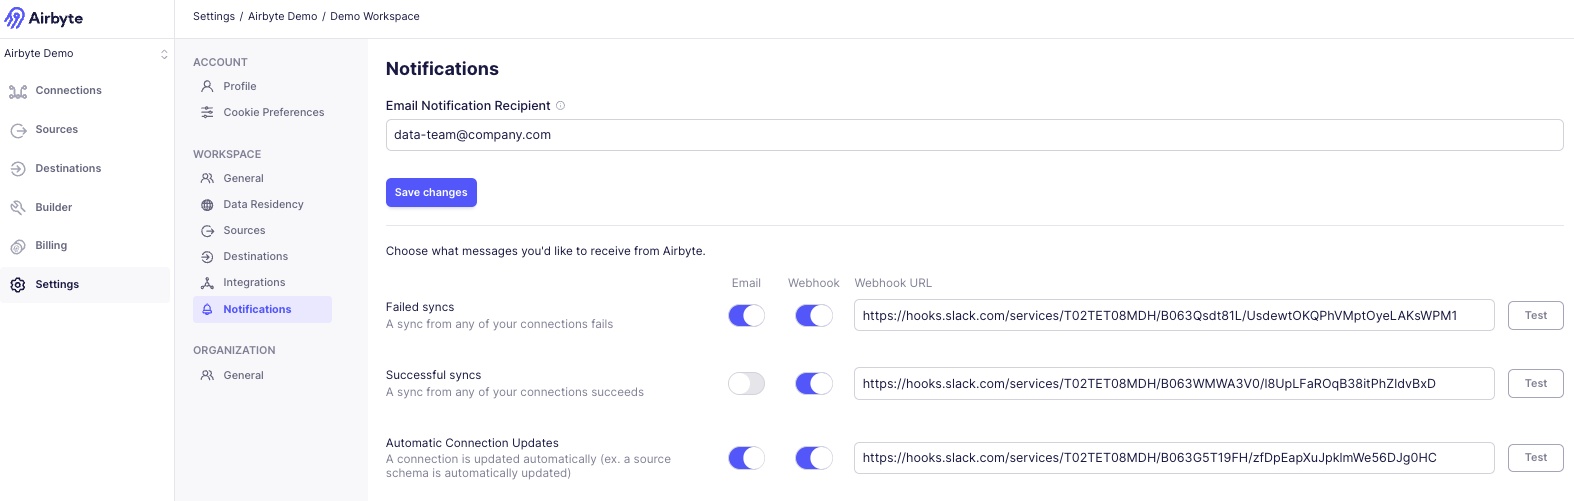
All email notifications except for Successful Syncs are enabled by default.
Modify the email recipient
To change the recipient, edit and save the notification email recipient. If you would like to send email notifications to more than one recipient, you can enter an email distribution list (ie Google Group) as the recipient.
Configure Webhook Notification Settings
Airbyte can send notifications to any generic webhook service. This is helpful when using a downstream service to trigger transformations or other tasks in your data stack.
Example Webhook Notification Payload
Open each section to see an example of the payload returned for the notification type.
Airbyte passes both the data payload along with text blocks that are intended for Slack usage.
Failed Sync
{
    "data": {
        "workspace": {
            "id":"b510e39b-e9e2-4833-9a3a-963e51d35fb4",
            "name":"Workspace1",
            "url":"https://link/to/ws"
        },
        "connection":{
            "id":"64d901a1-2520-4d91-93c8-9df438668ff0",
            "name":"Connection",
            "url":"https://link/to/connection"
        },
        "source":{
            "id":"c0655b08-1511-4e72-b7da-24c5d54de532",
            "name":"Source",
            "url":"https://link/to/source"
        },
        "destination":{
            "id":"5621c38f-8048-4abb-85ca-b34ff8d9a298",
            "name":"Destination",
            "url":"https://link/to/destination"
        },
        "jobId":9988,
        "startedAt":"2024-01-01T00:00:00Z",
        "finishedAt":"2024-01-01T01:00:00Z",
        "bytesEmitted":1000,
        "bytesCommitted":90,
        "recordsEmitted":89,
        "recordsCommitted":45,
        "errorMessage":"Something failed",
        "errorType": "config_error",
        "errorOrigin": "source",
        "bytesEmittedFormatted": "1000 B",
        "bytesCommittedFormatted":"90 B",
        "success":false,
        "durationInSeconds":3600,
        "durationFormatted":"1 hours 0 min"
    }
}
Note that errorType refers to the type of error that occurred, and may indicate the need for a followup action. For example config_error indicates a problem with the source or destination configuration (look to errorOrigin), while transient_error indicates a temporary issue that may resolve itself.
Successful Sync
{
    "data": {
        "workspace": {
            "id":"b510e39b-e9e2-4833-9a3a-963e51d35fb4",
            "name":"Workspace1",
            "url":"https://link/to/ws"
        },
        "connection":{
            "id":"64d901a1-2520-4d91-93c8-9df438668ff0",
            "name":"Connection",
            "url":"https://link/to/connection"
        },
        "source":{
            "id":"c0655b08-1511-4e72-b7da-24c5d54de532",
            "name":"Source",
            "url":"https://link/to/source"
        },
        "destination":{
            "id":"5621c38f-8048-4abb-85ca-b34ff8d9a298",
            "name":"Destination",
            "url":"https://link/to/destination"
        },
        "jobId":9988,
        "startedAt":"2024-01-01T00:00:00Z",
        "finishedAt":"2024-01-01T01:00:00Z",
        "bytesEmitted":1000,
        "bytesCommitted":1000,
        "recordsEmitted":89,
        "recordsCommitted":89,
        "bytesEmittedFormatted": "1000 B",
        "bytesCommittedFormatted":"90 B",
        "success":true,
        "durationInSeconds":3600,
        "durationFormatted":"1 hours 0 min"
    }
}
Automated Connection Updates
Webhook does not contain payload and only works for Slack notifications
Connection Updates Requiring Action
Webhook does not contain payload and only works for Slack notifications
Warning - Repeated Failures
Webhook does not contain payload and only works for Slack notifications
Sync Disabled - Repeated Failures
Webhook does not contain payload and only works for Slack notifications
Warning - Upgrade Required
Webhook does not contain payload and only works for Slack notifications
Sync Disabled - Upgrade Required
Webhook does not contain payload and only works for Slack notifications
Configuring Slack Notifications
The webhook notification also integrates easily with Slack.
If you're more of a visual learner, head over to this video to learn how to set up a Slack app to receive notifications. You can also refer to the Slack documentation on how to create an incoming webhook for Slack.
Create a Slack app
- To set up Slack notifications, navigate to https://api.slack.com/apps/. Select
Create an App.
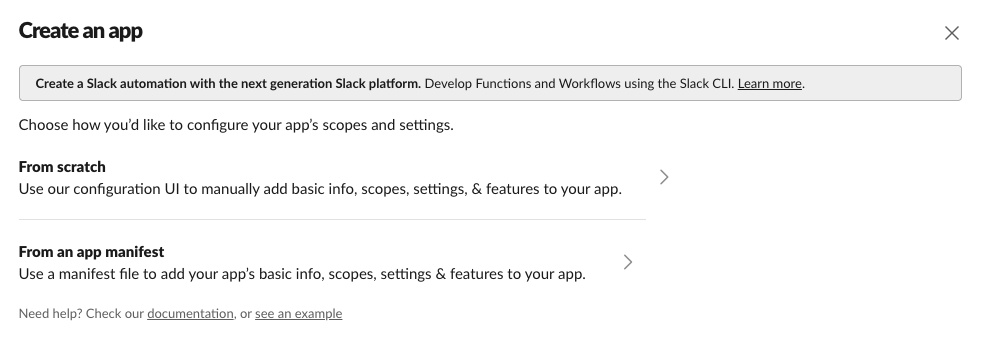
-
Select
From Scratch. Enter your App Name (e.g. Airbyte Sync Notifications) and pick your desired Slack workspace. -
Enable Incoming Webhooks: in the left sidebar, click on
Incoming Webhooks. Click the slider button in the top right to turn the feature on. Then clickAdd New Webhook to Workspace.
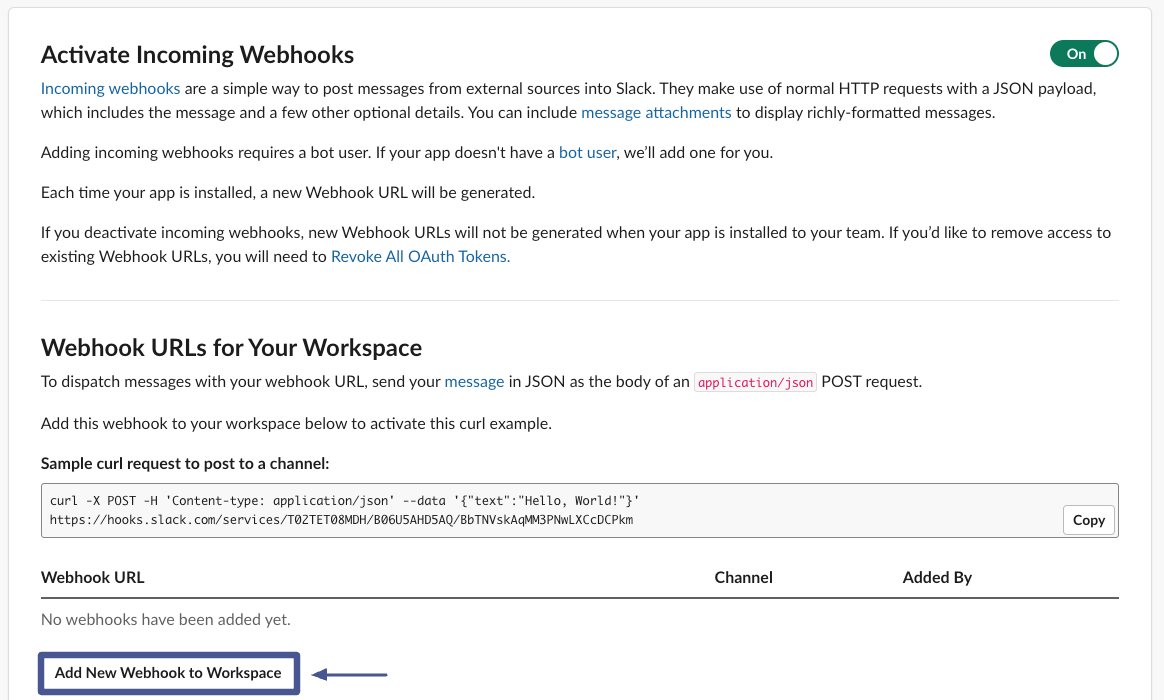
- Select the channel that you want to receive Airbyte notifications in (ideally a dedicated one), and click
Allowto give it permissions to access the channel. You should see the bot show up in the selected channel now. You will see an active webhook right above theAdd New Webhook to Workspacebutton.

- Click
Copy.to copy the link to your clipboard, which you will need to enter into Airbyte.
Your Webhook URL should look similar to this:
https://hooks.slack.com/services/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PM1
Enable the Slack notification in Airbyte
-
Click Settings and navigate to Notifications. On this page, you can toggle each slider decide whether you want notifications on each notification type. Paste the copied webhook URL to
Webhook URL. -
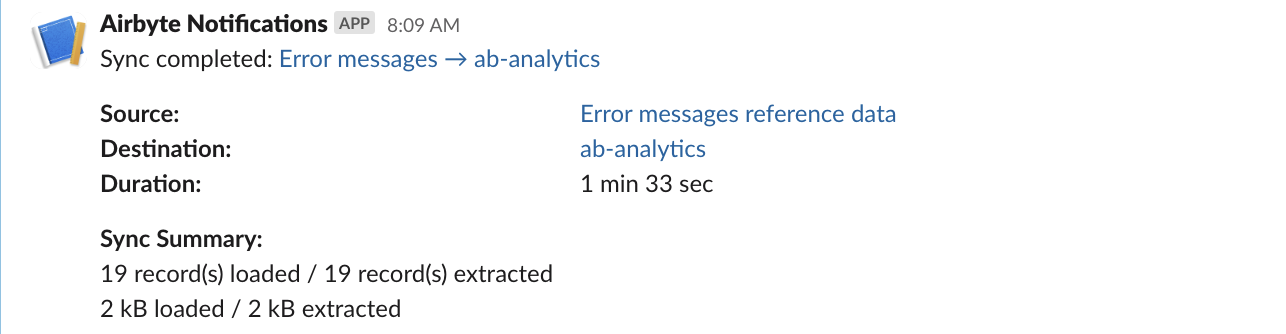
Test it out: you can click
Testto send a test message to the channel. Or, just run a sync now and try it out! For a successful sync, you should receive a notification that looks like this:
- Click Save changes to ensure you continue to receive alerts about your Airbyte syncs.